Manual: Share content with SURFsharekit

Manual: Share content with SURFsharekit

Engels    Nederlands

Entering new material

Start

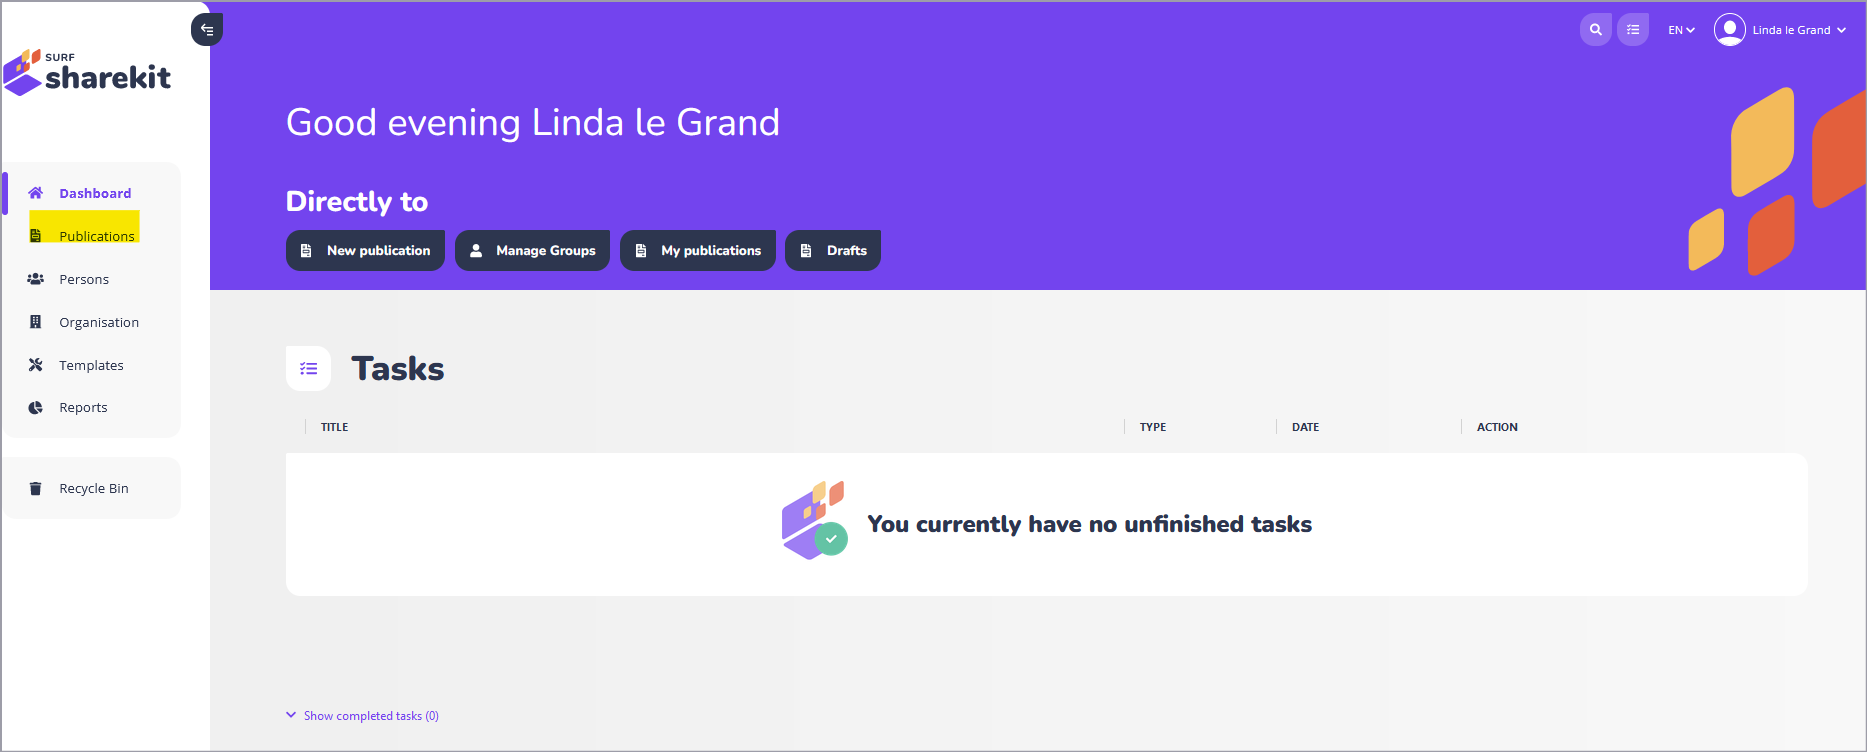
  • Sign in to surfsharekit.nl After signing in, the dashboard will appear. Here, choose 'publications' on the left side.


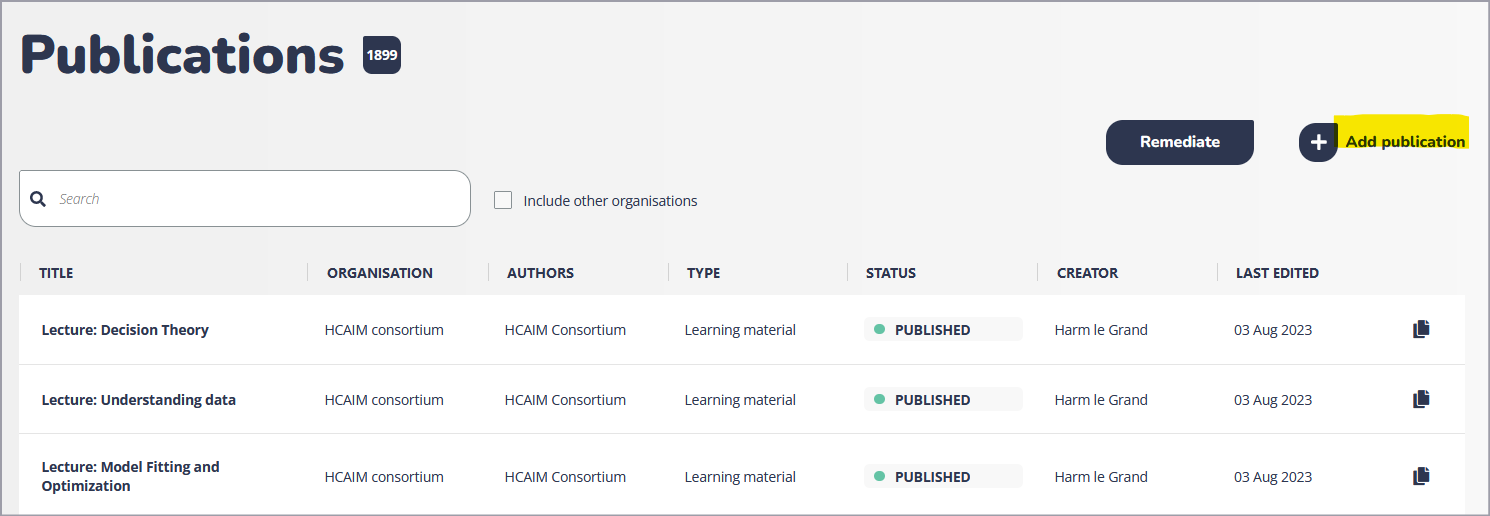
  • The screen 'publications' will appear. Here all publications are shown for which you have received metadata rights.
  • Click on 'add publication' in the top right corner.


  • If you have metadata rights for several organizational units, a popup will appear. In this popup, make the choice for which organizational unit you are going to add the course material.


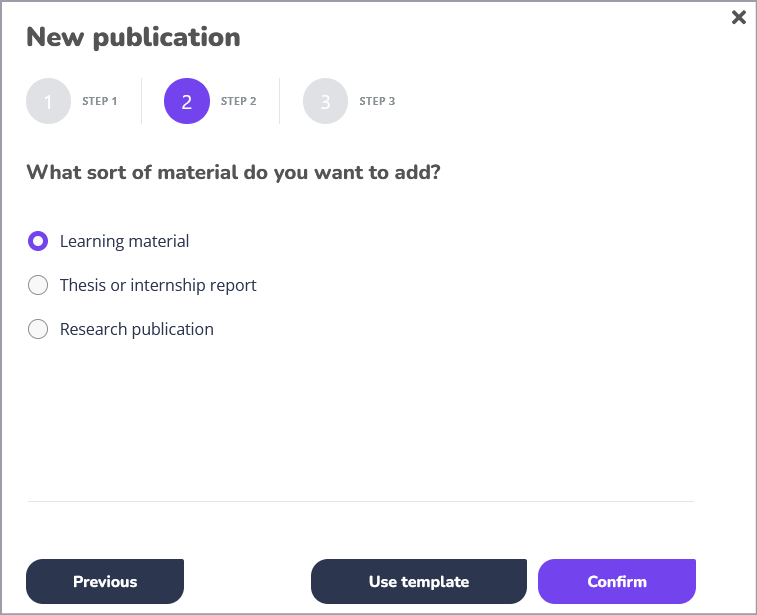
  • A popup will now appear in which you can specify the type of material to be metadated. In this case, choose 'learning materials' and then click 'confirm'.
  • The screen 'step 1 uploads' appears.


In SURFsharekit note that:

  • Fields marked with an asterisk are mandatory.
  • The record can be saved at any moment by clicking 'save' in the top right side of the screen.
  • Via the 'i' next to a field, additional information can be requested.
  • Learning material has the default status 'draft' until it is published.


Step 1: uploads

Multiple files and/or links can be added to a single publication record.

Files

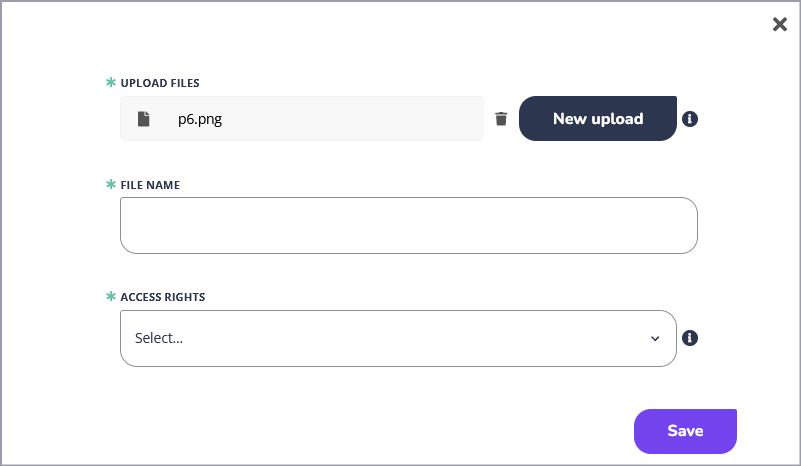
  • Under files, drag and drop (if applicable) the file(s) you want to add or click the plus sign and select the desired files from your device's file format. After the file is selected or dragged to the right place, a popup appears.
  • In the popup, specify the name of the file and the access rights. Please note that the maximum size of an added file is 500 MB.
  • Click 'save'. The popup closes and the added file becomes visible.

Note: If multiple files are added, the order of these files can easily be changed by dragging them to the correct order.

Links

  • Click (if applicable) on the plus sign 'add links' to add a link to the teaching material.
  • A popup will appear. Include the url, the url name and the access rights of the teaching material.
  • Then click 'Save'. The popup closes and the added link becomes visible.

Note: If multiple links are added, the order of these links can easily be changed by dragging them to the correct order.

Next step

Are all files and links added, click 'next step' on the bottom of the screen.

Step 2: data

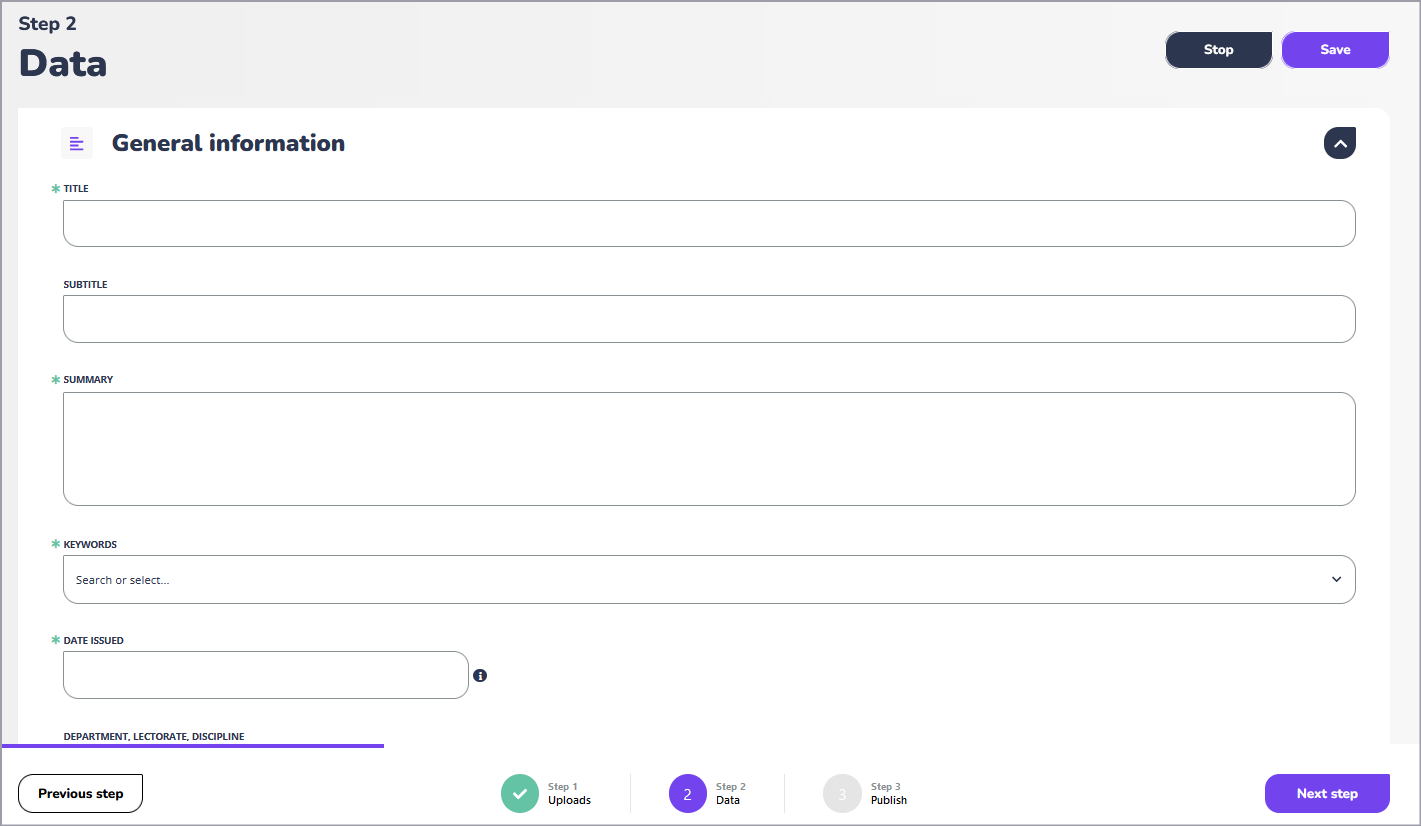
Step 2 Data appears. On the bottom of the screen the progress of the metadata-process is shown.

General information

  • Enter the title and a meaningful, brief summary of the teaching material. A subtitle may be added if preferred.
  • Enter meaningful keywords. Keywords can be specified comma separated. After <enter> or clicking on the + sign, the keywords are saved separately.


  • For publication date, enter the publication date as it is listed for the learning material.
  • If desired, enter department/lecorate/discipline.
  • If desired, enter the publisher of the material.
  • Choose the correct theme(discipline) and level.


  • Select the language. This is the main language used in the teaching material.
  • Select the terms of use that applies to the teaching material.


  • Click the plus sign to add an author/involved person. A popup screen will appear.
  • In the screen, search for the correct author.
  • If desired, search outside your own organization by checking the 'Include other organisations' box.
  • Select the author concerned. You will now be asked to select a role. Select the correct role and click on 'save'.


  • If the author's details are not (yet) known within SURFsharekit, they can be added by clicking on 'manual'.


  • Fill in the details and click 'next'. Name, email and organisation are mandatory. Is the email address of the author/person involved unknown, then select 'I don't know what the email adress of this person is'.
  • Click next/save to add the author/involved person.


Note: if several authors/involved persons are entered, it is possible to change the order in which these authors are displayed by dragging the lines.


Extra information

  • At 'Usable as', choose the aggregation level of the teaching material. Does it concern an element (such as an image), a lesson component (for example, a video, a separate assignment, an article), a lesson or a series of lessons.
  • If desired, under 'type of learning material', choose the type of material via the drop-down list, for example a test, an experiment, a game.
  • If desired, under 'technical format', choose the type of material via the drop-down list. Think of a 360° video, an app, an open textbook.
  • For 'intended end user', specify via the drop-down list the type of end user (teacher, student, author) for which the material is intended.
 
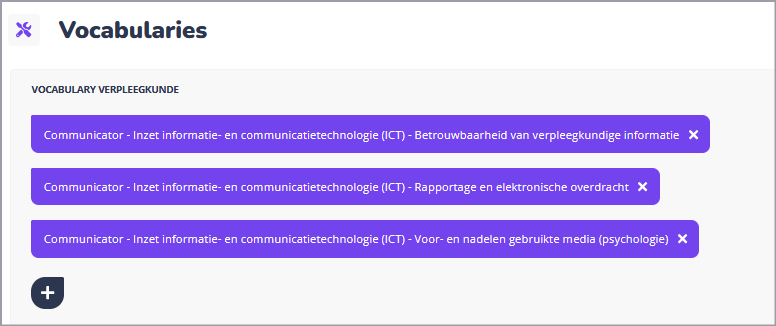
  • A 'subject vocabulary' has been developed for some subject areas. If access to a subject vocabulary has been provided, it will be displayed here.


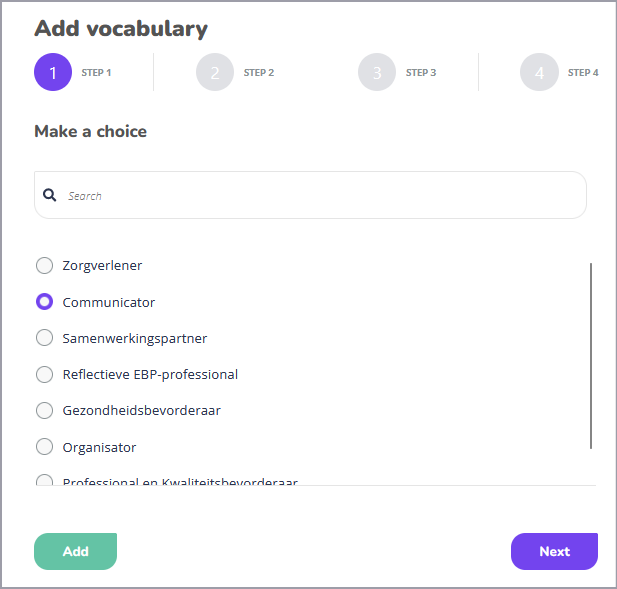
  • If applicable, click on 'add vocabulary'. The most global level of the vocabulary becomes visible. One choice can be made here. By clicking next, the next level (within the selection) becomes visible.
  • Ook op het volgende niveau kan één keuze worden gemaakt. Door op 'volgende te klikken' wordt binnen die keuze het volgende niveau zichtbaar.
  • Op het laagste niveau kunnen meerdere keuzes tegelijk worden gemaakt. Dit is zichtbaar doordat de vinkvelden hier de vorm van een vierkant hebben i.p.v. een rondje.

  • It is not necessary to make a choice down to the lowest level: you can click 'add' at any time. The choices made up to that point then become visible in SURFsharekit.


Note: the section 'linked teaching materials' is discussed separately.

Next step

Are alle data entered, click 'next step' on the bottom of the screen.


Step 3: publish

The Step 3: publishing screen is reached. Here you can indicate through which portals and by when the material will be found.

  • To make materials searchable through SURF's search portal and through Wikiwijs, under channels, set the edusources and Wikiwijs slider to 'on'.


  • Under the heading 'publish on', you can specify a date on which the material must be retrievable. If you leave the date blank, the material will be published as soon as possible. If edusources & Wikiwijs is selected, the material can be found within a few minutes via SURF's search portal.
  • Enter a publication date if applicable.
  • Click on 'publish'.
    • If not all required fields have been completed, a message will appear. If you scroll back to the beginning of the record, an annotation of the mandatory metadata that is still missing will be displayed.
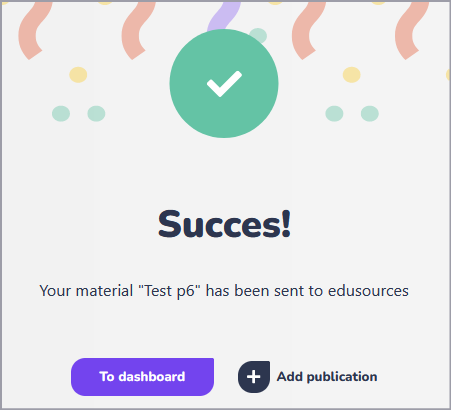
    • If all mandatory metadata is present, a message that publication was successful will appear after clicking 'publish'.


Using templates

A 'template' can be used when adding a new publication record. Any existing publication record for which the metadata publisher has access can be used as a template. If a template is used, all metadata of the template is copied to the new publication record.

Tip: Using a template saves time and is particularly practical if a large number of materials with partly the same characteristics have to be entered. In such a case, first create a (draft) publication record in which only the shared metadata is included. Give the record a distinctive name, for example 'template project xxx'. It is then easy to look up and use.

  • Click on 'add publication' and choose the correct organisational unit. The following screen appears. Choose learning material and click on 'use template' at the bottom.


  • Now choose 'learning material' and click on 'use template' at the bottom.
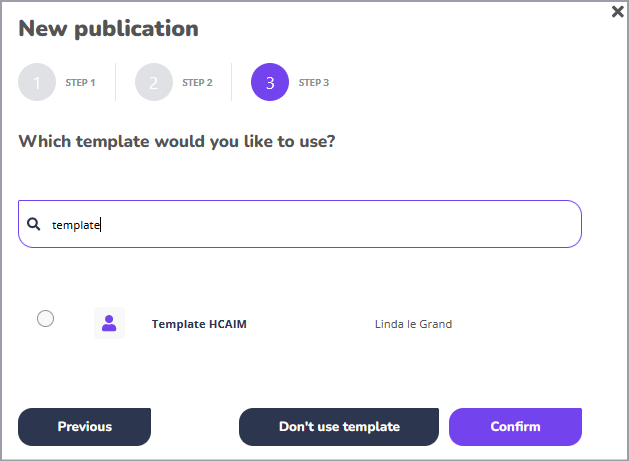
  • An overview is now shown of all learning materials that can be used as a template. If a specific template has been created, it can easily be found by typing in (part of) the title


  • Select the correct template and click 'confirm'.
  • A publication record is now visible in which all values ​​from the template have been copied. (note: if a publication record is used to which files and links are already linked, these will also be copied). The title has 'copy of .....<original title> entered.
  • The rest of the metadata can now be completed and the record can be published.

Create a collection through linked teaching materials

Introduction

A special functionality of SURFsharekit is the possibility of linking metadata teaching materials (publication records) together in a hierarchical relationship. This enables a collection of learning materials to be created.

A collection has the following characteristics:

  • Multiple teaching materials that together form a single entity.
  • Which are in a hierarchical/sequential relationship to each other.
  • Where each level must be able to be retrieved individually: they are characterized by unique metadata.

One example is a lesson series such as a MOOC that consists of a number of lessons. These lessons can also be used separately and are metadated separately. Linking the MOOC and the underlying lessons together produces a collection that can consist of two or more layers.

SURF's search portal shows both the MOOC as a whole, with the layer underneath, and the individual lessons. In each case, the connection to the upper and lower levels is clearly shown.

Schematic example:

Preparation

Before the actual linking of the teaching material in SURFsharekit is established, it is recommended to have a completely clear picture of the structure of the material.

  • How many levels need to be distinguished?
  • What material belongs at which level?
  • Should a file/link also be included at each level?

Work out the complete structure, for example in a spreadsheet.

Linking teaching material

a. Enter all lowest level materials into SURFsharekit and publish these.
b.
  • Now enter one of the materials from a higher level into SURFsharekit.
  • For this material, under 'additional data', go to 'link learning materials' and click 'add learning materials'.
  • A popup will appear. Here, find the first material to be linked by typing part of the title into the search bar. Please note that the material you link here will be placed hierarchically UNDER the relevant publication record.
  • Select the correct learning material and click on 'next'.
  • The 'relation' of the material is displayed. By default this is set to 'is part of'. At the moment no other choice is possible: so click 'save'.
  • Now find the next material to be linked under this record and perform the same actions. Repeat until all materials to be linked under this record are linked.
  • Publish the record.
c. Repeat step b. until the entire structure has been processed.


The order in which the linked teaching materials are displayed is changeable by drag and drop.

Editing published material

Delete

Material entered into SURFsharekit can, of course, be removed afterwards.
  • Go to the 'publications' section.
  • Find the publication record you want to delete. By typing part of the title or keyword in the search bar, you can find the desired publication record.


  • Click on the relevant publication record to display the contents of the record.
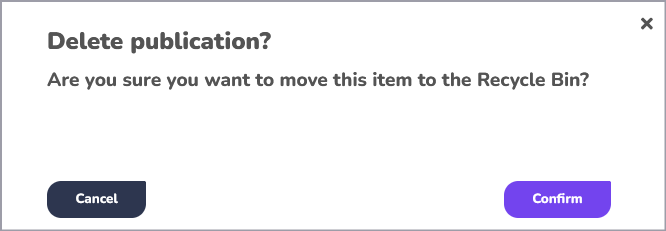
  • Now click the recycle bin in the upper right corner to delete the record.


  • A warning is shown.


Draft

Note: if the material to be removed has the status 'draft', the 'recycle bin' will also directly be visible in the list of publications. The material can then directly be removed .


Edit

Material entered into SURFsharekit can, of course, be edited afterwards.
  • Go to the 'publications' section.
  • Find the publication record you want to change. By typing part of the title or keyword in the search bar, you can find the desired publication record.


  • Only a record that does NOT have the status 'published' can be changed directly. If the record to be modified does NOT have the status published and you click on the desired record, you can immediately make changes.
  • If the status of the record to be modified is indeed published, click on the record and then on the button 'edit' in the upper right corner. Make your changes.

    ATTENTION: after clicking on the button 'edit' your publication record automatically gets the draft status. When you are finished with your changes, click 'publish' to keep the published status.
    If you do not want to publish the record, click 'save' when you are finished.


  • Het arrangement Manual: Share content with SURFsharekit is gemaakt met Wikiwijs van Kennisnet. Wikiwijs is hét onderwijsplatform waar je leermiddelen zoekt, maakt en deelt.

    Auteur
    SURF
    Laatst gewijzigd
    2023-08-14 20:20:38
    Licentie

    Dit lesmateriaal is gepubliceerd onder de Creative Commons Naamsvermelding 4.0 Internationale licentie. Dit houdt in dat je onder de voorwaarde van naamsvermelding vrij bent om:

    • het werk te delen - te kopiëren, te verspreiden en door te geven via elk medium of bestandsformaat
    • het werk te bewerken - te remixen, te veranderen en afgeleide werken te maken
    • voor alle doeleinden, inclusief commerciële doeleinden.

    Meer informatie over de CC Naamsvermelding 4.0 Internationale licentie.

    Aanvullende informatie over dit lesmateriaal

    Van dit lesmateriaal is de volgende aanvullende informatie beschikbaar:

    Toelichting
    Manual share content with SURFsharekit
    Eindgebruiker
    leerling/student
    Moeilijkheidsgraad
    gemiddeld

    Gebruikte Wikiwijs Arrangementen

    SURF. (z.d.).

    Handleiding deel content met SURFsharekit

    https://maken.wikiwijs.nl/176149/Handleiding_deel_content_met_SURFsharekit