Naginata Beginner's Guide

Naginata Beginner's Guide

Introduction

Welcome!

My name is Charlotte and I have been doing Naginata for a few years now. Unlike any other sports I know, Naginata has a lot of theory. This could scare a lot of new people from doing Naginata, which is a shame, because Naginata is such a beautiful practice! That is why I have developed this guide to make (the theory of) Naginata much more accessible for beginners. As an Educational Scientist, I have applied my knowledge and skills about Instructional Design to create this online module.

The theory in this beginner’s guide is focused on the theoretical part of the Dutch 6th, 5th and 4th kyu grade exams. (You can find all the requirements of these exams here.) Because of this specific focus, it does not cover all theory within Naginata or cover all the theory of the beginner’s exams from other countries. Though, it may cover some aspects and contain some useful information and exercises, but please check the actual requirements of the exam you will partake in!

For this guide, I have used multiple sources, but especially Alex Bennet’s (2016) handbook ‘Naginata: History and Practice’ and my (or other’s) experience within Naginata. If you want more information on Naginata, I recommend you to use (or purchase) Bennet’s handbook or to participate at (international) Naginata seminars. That way, you also support the European Naginata Federation (ENF) and International Naginata Federation (INF)!

If you have any feedback or remarks on this beginner’s guide, please send a mail to here. Because this is a voluntary and unofficial project, I might not respond as quickly as you may expect, but I appreciate all feedback!

I would like to thank everyone who has helped me in this project! But I especially want to thank you for using my guidebook! Good luck with studying!

How should you read this guide?

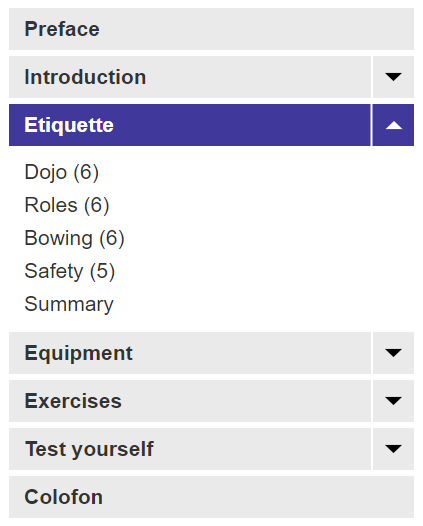
In this ‘how-to-read’ chapter, you will understand how the guide is structured. This guide has three major theoretical chapters. They are based on the theoretical part of the Dutch 6th, 5th and 4th. These chapters are: 1) Etiquette, 2) Equipment, and 3) Exercises. Every chapter begins with a short, informal introduction of the content before going into the actual theoretical content. These contents are divided into minor chapters, each having a title with a ‘(6)’, ‘(5)’ and/or ‘(4)’, as you can see in the picture below.

This number corresponds to the study material in the 6th, 5th or 4th kyu exam. By marking the corresponding exam, you don’t have to study every minor chapter for the 6th or 5th kyu exam. (For the 4th kyu exam, you should actually know all the content in this module.) Keep in mind that some minor chapters may contain more learning content than you might have to learn. For example, in the minor chapter ‘partner exercises’, for your 5th kyu exam, you only need to know the term soutai and not all the details of the uchikeashi, shikake-oji, etcetera. (Though, it might not hurt to study these materials already.) If you want to be sure, you can check the most recent requirements here.

In every chapter, there are bold words. They refer to keywords you need to know for your exam and in general in Naginata. There are also cursive words that refer to other keywords that were explained or will be explained in an other (major or minor) chapter. They may also not be explained at all, because they are minor details for a Naginata beginner. There also exercises within every minor chapter, so you can practice with what you have studied.

Every chapter ends with a Summary, which recaps the entire chapter with more exercises and a list of keywords or informative pictures, depending on the learning goals of that chapter. When you are done studying and want to test your knowledge, you can go to ‘Test yourself’ and ‘do an exam’. You ‘pass’ if you can have more than 80% right.


Before you go studying…

Keep in mind that all exercises and questions in this manual for self-study are closed-ended questions (like multiple choice questions). In contrary, the actual exam only has open-ended questions, meaning you have to write down your own answer instead of selecting an answer. That is why I recommend, after studying what you wanted to study in this guide, to test yourself by writing down your own answers on paper and checking the answers by yourself. For the correct answers, you can use the ‘Summary’ at the end of every theoretical chapter.

Good luck with studying!

Etiquette

If you already have participated at least at one Naginata practice, you may have noticed some ‘weird’ rituals: You have to bow all the time, you have to pick up your Naginata in a certain manner, you have to stand in a very specific spot just before and after practice, etcetera. These ‘odd’ practices are actually part of the etiquette of Naginata. Like in every budo sports, etiquette is an important matter, and happens before, during and after practice. By following proper etiquette, you’re not only showing respect to your fellow Naginata practitioners, but you will raise your own self-awareness. The practice will also run more smoothly and quickly and thus more efficiently.

For this chapter, etiquette is divided into four parts: dojo, roles, bowing and safety. After studying this chapter (or specific parts of this chapter), you will be able to answer these questions:

Dojo:

  • What is a dojo?
  • What is the the meaning of the shomen in the dojo?

Roles:

  • What is a senpai?
  • What is a kohai?
  • What is the relation between a senpai and kohai?

Bowing:

  • What does rei mean?
  • What does otaga-ni-rei mean?
  • What does sensei-ni-rei mean?
  • What does mokuso mean?

Safety:

  • What are the general terms of etiquette, safety, and respect in naginata?
  • What are examples of how these concepts are put in practice?

Dojo (6)

To practice Naginata, you need a dojo. A dojo refers to the training hall where Naginata is being practiced. A dojo always has a shomen. It actually means ‘the centre of the face or head’, but in Naginata, it refers to the altar or sacred place in the dojo. This place can have an altar, banner of the club, a picture of the sensei (teacher) or something else that represents that ‘sacredness’. The shomen is usually located as far as possible from the door, so that place remains safe for potential threats from outside. That is also why, for example, you put away and pick up your Naginata with the blade facing away from the shomen.

Oefening: Exercises 'dojo'

Start

Roles (6)

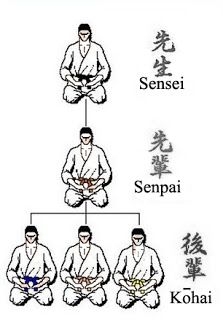
In Naginata, you can take many roles. Some roles only apply during practice (like sensei for teacher), while other roles also apply outside practice. You can, for example, have the role of a senpai or kohai. These two roles represent a hierarchical relationship, in which the senpai (senior) has more experience and a higher level in Naginata than the kohai (junior). The picture below represents this relationship.

The senpai has a higher position that the kohai, but he or she should assist the kohai as much as possible in Naginata. This relationship also explains, for example, when you do a line up just before and after practice, the kohai sit away from the shomen while the senpai sit near the shomen. (The shomen is a sacred and safe place and therefore a better spot.

Oefening: Exercises 'roles'

Start

Bowing (6)

In Naginata, like many other budo sports, you bow a lot to show respect to others and the sport. This bow of respect is called rei. When you bow towards the shomen, the angle should be about 30 degrees. When you bow towards an opponent or partner, the angle should be about 15 degrees. You should keep eye contact and keep your back as straight as possible when bowing. Bowing does not only happen to initiate or finish an exercise, but also to start or wrap up practice.

The starting or finishing of a Naginata practice happens in a certain sequence. When finishing a practice, every step is executed whenever a certain command is called:

  1. Seiretsu (Line up)
  2. Shizentai (Stand straight and natural)
  3. Shakuza (Sit down)
  4. Mokuso (Meditate, focus on breathing)
  5. Mokuso yame (Stop meditating)
  6. Sensei ni rei (Bow for your sensei to pay respect)
  7. Shomen ni rei (Bow for the shomen)
  8. Otaga ni rei (Bow for your Naginata partners)
  9. Onegai shimasu (‘Let’s have a good practice, please’) / Arigato gozaimashita (‘Thank you for the good practice.’)

Important: Step 6 and 7 are switched when you finish practice. 

Oefening: Exercises 'bowing'

Start

Safety (5)

Safety in Naginata can be expressed in many forms. For example, you have to maintain your equipment properly and you have to take your jewellery off. To define proper safety protocols within Naginata, it’s best to discuss this with your sensei (teacher), senpai (seniors) or fellow kohai (juniors). Also, think about possible actions that guarantee safety during practice.

Summary

Key words:

Dojo = training hall

Shomen = the altar or sacred place in the dojo

Senpai = senior who has more experience and a higher rank than the kohai in Naginata

Kohai = junior who has less experience and a lower rank than the senpai in Naginata

Rei = bow of respect

Otaga-ni-rei = bow to pay respect to your Naginata partners

Sensei-ni-rei = bow to pay respect to your Naginata sensei (teacher)

Mokuso = meditation with a focus on breathing

Oefening: Exercises 'etiquette'

Start

Equipment

You might have started doing Naginata, because of the ‘cool’ weapon and armour. (At least for me, partially, because it reminded me of Japanese comics.) Although they seem nice, they consist of separate parts that should be properly wielded and taken care of. Knowing these parts make explaining everything about Naginata much easier: exercises, etiquette, safety, etcetera.

For this chapter, equipment is divided into two parts: Naginata and bogu. After studying this chapter (or specific parts of this chapter), you will be able to answer these questions:

  • What are the separate parts of the Naginata?
  • What are the separate parts of the bogu?

Naginata (6)

The Naginata is a pole weapon about 2.10-2.25m with a blade at the end. It contains separate parts, as can be seen in the picture below.


The parts are as following (from left to right):

  • Habu = the blade part of the Naginata
    • Kissaki = the tip of the habu
    • Monouchi = the part of the habu which you make cuts
    • Ha
    • Mine (mini)
    • Sori
    • Shinogi = the sides of the habu
  • Sendan-maki = the white plastic tape that binds the habu and e-bu together
  • E-bu = the pole part of the Naginata
    • Ishizuki = the tip of the e-bu

Tip! Some parts might be harder to memorize than other parts. That is why it’s a good idea to think about mnemonics in your own language! For example, think about the word ‘kiss’ in the kissaki, like ‘you would kiss someone on the head with the Naginata’.


Here below, you can see an instructional video of how to attach the habu to the ebu.

Oefening: Exercises 'naginata parts'

Start

Bogu (4)

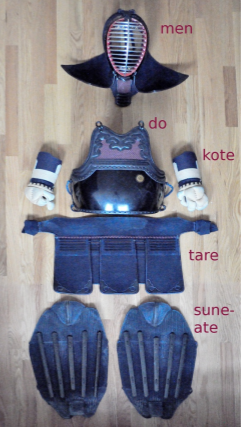
The armour used in Naginata is called bogu. It is designed to protect all the target areas, without impending movements. The bogu contains of five parts, as can be seen in the picture below.

Oefening: Exercices 'bogu parts'

Start

Folding hakama and gi (5)

Folding your Naginata clothes, called hakama ( black or dark blue pants-skirt) and gi (white shirt). You can also wear a obi (white belt) underneath for better fit. This is usually recommened by your senpai or sensei. How to fold your hakama and gi can be seen in the video below. (The video is in Dutch and has English-generated subtitles which may or may not be translated correctly.)

Folding the hakama

Summary

Oefening: Exercices 'equipment'

Start

Exercises

As a beginner, you might be confused during practice frequently. You are expected to do specific, complicated exercises whenever sensei calls an unknown Japanese word. There are commands for smaller exercises, like footwork, but also for bigger exercises, like partner exercises. Maybe it's a little bit too much to memorize! Or a bit too boring to do the same exercise over and over... But did you know that all these exercises are incredibly well-thought? Knowing what these exercises are, will make your technique much better. It will also make the practice much easier for yourself and your partners.

For this chapter, exercises are divided into three parts: customs during practice, individual exercises, and partner exercises. This chapter will also have some pictures and videos to help you visualize these exercises. After studying this chapter (or specific parts of this chapter), you will be able to answer these questions:

Customs during practice:

  • What is zanshin?
  • What is datotsu-bui?
  • What is yoku-datotsu?

Individual exercises:

  • What is kihon?
  • What are all the kamae?
  • What are all the uchi?
  • What are all the tai-sabaki?

Partner exercises:

  • What is soutai?
  • What is shikake-oji?
  • What is uchikata?
  • What is ukekata?
  • What is uchikomi-geiko?

Individual exercises (5, 6)

Individual exercises within Naginata include stances, strikes and footwork. They are all part of kihon, which means basics or fundamentals of Naginata.


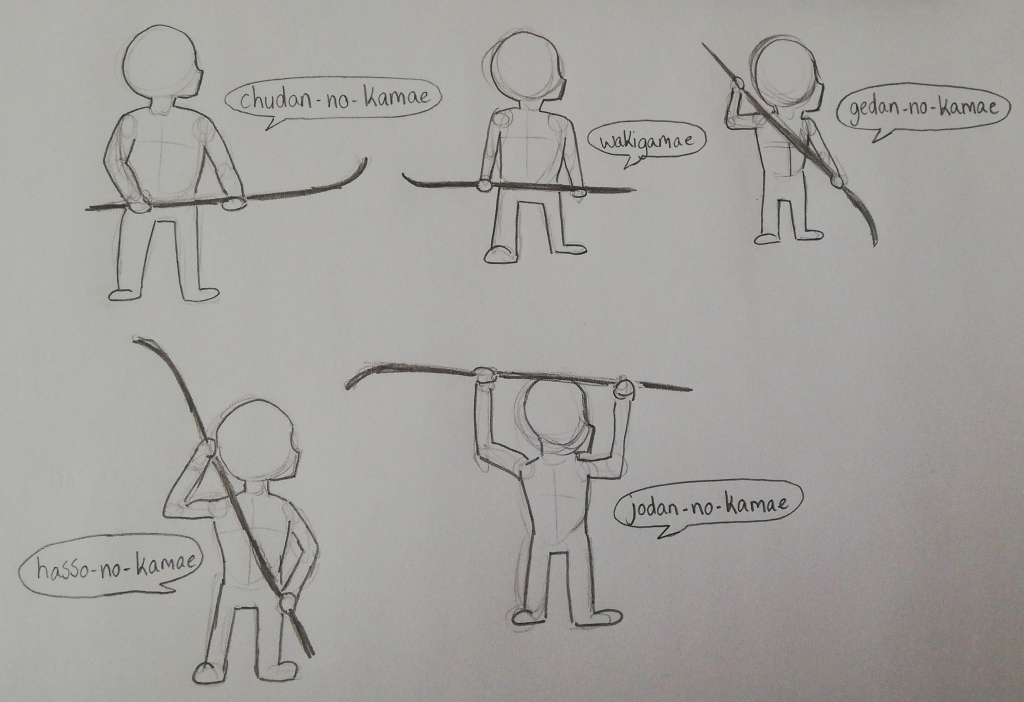
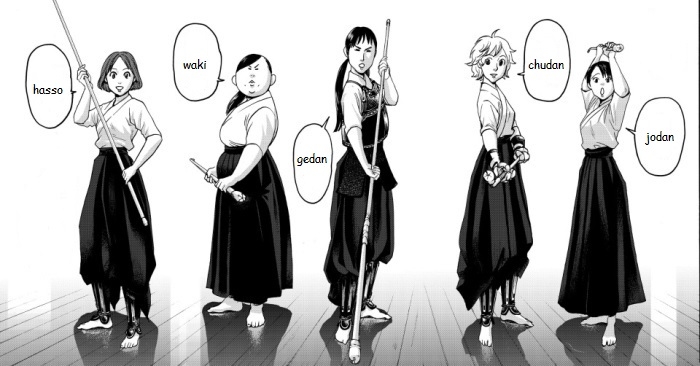
The fighting stances within Naginata are called kamae. They can have a defensive or offensive purpose. There are five kamae in Naginata (which can be seen in the picture below):

- chudan-no-kamae

- hasso-no-kamae

- gedan-no-kamae

- wakigamae

- jodan-no-kamae

Toets: Exercises Individual exercises

Start

Partner exercises, part 1 (5)

All partner exercises happen with soutai. It is the four meter distance between two partners when facing each other. You always start and finish a partner exercise with this distance. There are different partner exercises, some are done with or without bogu.


Uchikeashi is a basic exercise for repetitive striking of men and sune. The exercise helps you to better understand your body movement, footwork, breathing technique, correct grip, distancing and so on. It can be done with or without bogu, and with or without partner (then you have an imaginary partner). Uchikeashi is done in six steps:

  1. Furiage men
  2. Sokumen (from the left)
  3. Sokumen (from the right)
  4. Sune (from the left)
  5. Sune (from the right)
  6. Furiage men

You can see the full exercise in the video below from 2:20 till 2:53. 

Uchikeashi (2:20-2:53)


Shikake-oji is partner exercise that consists out of eight prearranged movements and techniques. In this exercise, the attacker is called shikake or uchikata, and the defender is called oji or ukekata. You can see all the eight drills in the video below. In this video, the shikake is on the right side, the oji is on the left side. 

Shikake-oji

Important in this shikake-oji video is the pacing is quite fast, most probably because the practioners are very experienced. If you are a beginner (like a 6th or 5th kyu), you don't need to do this exercise as quickly as they do! 

Toets: Exercises Partner exercises

Start

Partner exercises, part 2 (4)

Uchikomi-geiko is a practice fight in which the motodachi shows openings with going back to chudan-no-kamae after each strike. The kakarite attacks the open target and returns to proper distance in chudan-no-kamae before each new strike. It looks like 0:20-0:55 in the video below. 

Uchikomi-geiko (0:20-0:55)

Other (4)

During the entire practice, it’s important to maintain zanshin. Zanshin means maintaining physical and mental alertness after attacking. For example, if you do shikake-oji and you have done your strikes as shikake, it doesn’t mean you can just look away. Even when you’re waiting on the oji, you have to maintain eye-contact as a way of exerting focus.

When doing partner exercises with or without bogu, it’s important to perform a yoku-datotsu (a valid strike) to hit a datotsu-bui (a valid target).


Toets: Exercises Other

Start

Summary

Kihon = basics or fundamentals of Naginata

Kamae = fighting stances with five in total: 1) chudan-no-kamae, 2) hasso-no-kamae, 3) gedan-no-kamae, 4) wakigamae, and 5) jodan-no-kamae

Soutai = four meter distance between two partner when facing each other

Uchikeashi = basic exercise for repetitive striking of men and sune

Shikake-oji = partner exercise that consists out of eight prearranged movements and techniques

Uchikata = the attacker within the shikake-oji excercise, or a hit from the shikake

Ukekata = the defender within the shikake-oji exercise, or a block from the oji

Uchikomi-geiko = a practice fight in which the motodachi shows openings with going back to chudan-no-kamae after each strike. The kakarite attacks the open target and returns to proper distance in chudan-no-kamae before each new strike

Zanshin = maintaining physical and mental alertness after attacking

Yoku-datotsu = a valid strike

Datotsu-bui = a valid target


Toets: Exercises Exercises

Start

Test yourself

6th kyu test

Before you go testing…

Keep in mind that all exercises and questions in this manual for self-study are closed-ended questions (like multiple choice questions). In contrary, the actual exam only has open-ended questions, meaning you have to write down your own answer instead of selecting an answer. That is why I recommend, after studying and testing what you wanted to do in this guide, to test yourself by writing down your own answers on paper and checking the answers by yourself.

Good luck!

Toets: Test 6th kyu

Start

5th kyu test

Before you go testing…

Keep in mind that all exercises and questions in this manual for self-study are closed-ended questions (like multiple choice questions). In contrary, the actual exam only has open-ended questions, meaning you have to write down your own answer instead of selecting an answer. That is why I recommend, after studying and testing what you wanted to do in this guide, to test yourself by writing down your own answers on paper and checking the answers by yourself.

Good luck!

Toets: Test 5th kyu (without 6th kyu questions)

Start

Toets: Test 5th kyu (with 6th kyu questions)

Start

4th kyu test

Before you go testing…

Keep in mind that all exercises and questions in this manual for self-study are closed-ended questions (like multiple choice questions). In contrary, the actual exam only has open-ended questions, meaning you have to write down your own answer instead of selecting an answer. That is why I recommend, after studying and testing what you wanted to do in this guide, to test yourself by writing down your own answers on paper and checking the answers by yourself. 

Good luck!

Toets: Test 4th kyu (without 5th and 6th kyu questions)

Start

Toets: Test 4th kyu (with 5th and 6th kyu questions)

Start