

Het arrangement Units 2 plants is gemaakt met Wikiwijs van Kennisnet. Wikiwijs is hét onderwijsplatform waar je leermiddelen zoekt, maakt en deelt.
- Auteur
- Laatst gewijzigd
- 20-06-2015 10:49:23
- Licentie
-


Dit lesmateriaal is gepubliceerd onder de Creative Commons Naamsvermelding 3.0 Nederlands licentie. Dit houdt in dat je onder de voorwaarde van naamsvermelding vrij bent om:
- het werk te delen - te kopiëren, te verspreiden en door te geven via elk medium of bestandsformaat
- het werk te bewerken - te remixen, te veranderen en afgeleide werken te maken
- voor alle doeleinden, inclusief commerciële doeleinden.
Meer informatie over de CC Naamsvermelding 3.0 Nederland licentie.
Aanvullende informatie over dit lesmateriaal
Van dit lesmateriaal is de volgende aanvullende informatie beschikbaar:
- Toelichting
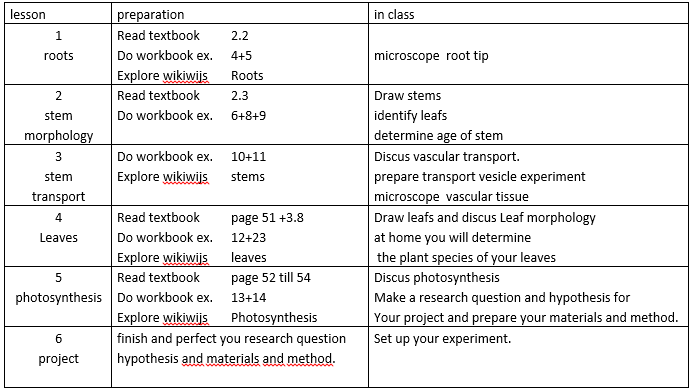
- This aragement consits of 6 lessons about plants for 1 TTO. It covers the subject an works paralel to the book your biology.
- Leerniveau
- VWO 1;
- Leerinhoud en doelen
- Biologische eenheid; Biologie; Opbouw van leven;
- Eindgebruiker
- leerling/student
- Moeilijkheidsgraad
- gemiddeld
Bronnen
| Bron | Type |
|---|---|
|
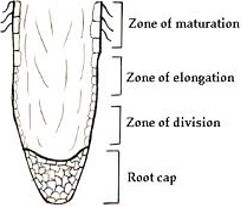
Roots http://www.biologiepagina.nl/Flashfiles/Ispring/Wortel.htm |
Link |
|
Video growth of a root https://www.youtube.com/watch?v=eDA8rmUP5ZM |
Link |
|
stems http://www.biologiepagina.nl/1/Planten/stengel.htm |
Link |
|
Prezi Stem https://prezi.com/-yssjtuml2gg/stem/?utm_campaign=share&utm_medium=copy |
Link |
|
leaves http://www.biologiepagina.nl/1/Planten/blad.htm |
Link |
|
leaves in depth http://www.bioplek.org/animaties%20onderbouw/fotosyntheseonderb/bladalgemeen.html |
Link |
|
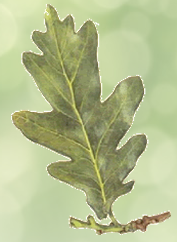
determine trees by there leaves http://www.tree-key.org/tree-identification-by-leaf.html |
Link |
|
photosynthesis song https://www.youtube.com/watch?v=C1_uez5WX1o |
Link |
|
photosynthesis explained http://www.biologiepagina.nl/Flashfiles/Ispring/fotosynthese.htm |
Link |
|
how to use google drive https://www.youtube.com/watch?v=epJi5qUw1rc |
Link |