EndNote is a reference management tool that can help manage and process information sources. It can be a handy tool to use in your research assignments or thesis. After all, you will be collecting a lot of articles that you need to incorporate into your text.
EndNote can help you with this, because
You store all your information sources in one place
You can group the sources to create structure
You can save the full text of articles to the sources
You can automatically create literature references in Word in any desired referencing style, including APA
You can change the referencing style with one click
What will you learn in this training?
This training course focuses on learning to work with the EndNote tool. The training is intended for HBO students and no specific prior knowledge is required to follow the training.
You will learn:
How to create an EndNote library
How to add articles to EndNote
How to create structure
How to auto-reference in Word
How it works
The training consists of 6 modules. Each module contains explanations and sometimes short videos. You can go through the modules from start to finish or do them independently. Click the 'Next' button at the bottom right of this screen to start.
1. Installing Endnote
On your own device
Students and employees of the Rotterdam University of Applied Sciences can install EndNote for free on their own device. To do so, click on the button below and download the installation file from our website (login required).
EndNote is available on the devices of Rotterdam University of Applied Sciences via the Start menu ➡ Liquit ➡ EndNote.
Synchronising
A useful feature of EndNote is the option to synchronise. This is particularly useful if you use EndNote on different devices.
Click on edit ➡ Preferences...
At Sync: Click the "Enable Sync" button and enter your EndNote Web login details, or create a new account. This way, you can synchronise the EndNote library between different installations.
2. Getting started with EndNote
2.1 Creating an EndNote library
Figure 1 Starting a new library.
Ceating a new library
Open EndNote by clicking on the icon.
After opening it, click on 'File' at the top left and then on 'New'.
Give your personal EndNote library a name and save the file e.g. in a folder called endnote.
Note!Never save your EndNote library in the cloud, such as OneDrive, Dropbox, Google Drive or iCloud. This may cause your data to become corrupted and you may lose data.
Note!In Windows Explorer (Windows) or Finder (Mac) you will find two files: one with your EndNote library (extension .enl) and a data folder (extension .data). You always need both files! If you delete one of the files, the library will no longer work.
Figure 2 A stored library consists of two files.
Tip:It is not necessary to create a separate library for each assignment. Within your own library (max. 100,000 references) you can create groups per subject or research topic. You can read how to do this in section 4.1.
2.2 What does EndNote look like?
The EndNote interface can be divided into four sections:
At the top: the menu bar of EndNote
Left: information about the number of references in the library.
Middle section: search bar and overview of references.
Right: if you click an article in the middle section, you get a small preview of the article.
Information about the different sections will be provided later in the online training
Figure 3 EndNote interface. The numbers refer to the four sections. For explanations, see the text above the image
3. Adding references to a library
When you create a new library, it is initially empty. You will have to fill it with references yourself. How to do this is explained in this part of the training.
There are three methods for doing this.
Importing references from a database
Manually adding a reference
Search and import references via EndNote (see section 6.1, advanced options).
After adding a reference, you can always edit it at a later date. For how to do this, see section 4.4.
3.1 Importing from a database
How to import references from a database (e.g. PubMed, OneBusiness, Business source Premier, CINAHL, ERIC) varies from one database to another. How to do this is explained below for the most commonly used databases within RUAS.
If the database you use is not listed and you need support, please contact the library. Look for contact details on the website (www.rotterdamuas.com/library).
Business Source Premier/CINAHL/ERIC (EBSCOhost databases)
Select the references you want to import, by clicking on the blue folder (yellow arrow). The references are saved in a temporary folder.
Click on 'Folder' at the top.
Select 'Export' on the right-hand side.
Select 'Direct Export in RIS Format (e.g. CITAVI, EasyBib, EndNote, ProCite, Reference Manager, Zotero)' and click 'Save'.
A file will be downloaded and after opening this, the references will be imported directly into the EndNote 'Imported references' folder.
Google Scholar
Go to Google Scholar settings, by clicking on the three horizontal lines at the top left.
Under Bibliography manager, select 'Show links for import into EndNote'. Click on 'Save'.
When searching in Google Scholar, the references will now show the option 'Import into EndNote'.
4. Click on 'Import into EndNote'. A file will be downloaded and after opening this, the references will be imported directly into the EndNote 'Imported references' folder.
Tip! Delete the downloaded RIS files once in a while to avoid confusion, as the names are very similar.
One Business
Select the references you want to import, either by clicking on the box in front of the article or by clicking on the article title
On the right-hand side, click on Cite
Then click on RIS (Endnote, Clivati, etc.)
A file will be downloaded and after opening this, the references will be imported directly into the EndNote 'Imported references' folder.
PubMed
Select the references you want to import, by clicking the box in front of the item.
Click on 'Send to'.
Select 'Citation manager'.
PubMed then asks again which references you want to import.
Selection: the ticked articles from step 1
All results: all references (up to max. 10,000) in the search query
All results on this page: all references on the page, by default 10.
Click 'Create file'. A file will now be downloaded.
A file will be downloaded and after opening this, the references will be imported directly into the EndNote 'Imported references' folder.
Knowledge clip WINDOWS
Knowledge clip is without sound.
Knowledge clip MAC (2:45 until 3:33)
Knowledge clip is withsound.
3.2 Manually adding a reference
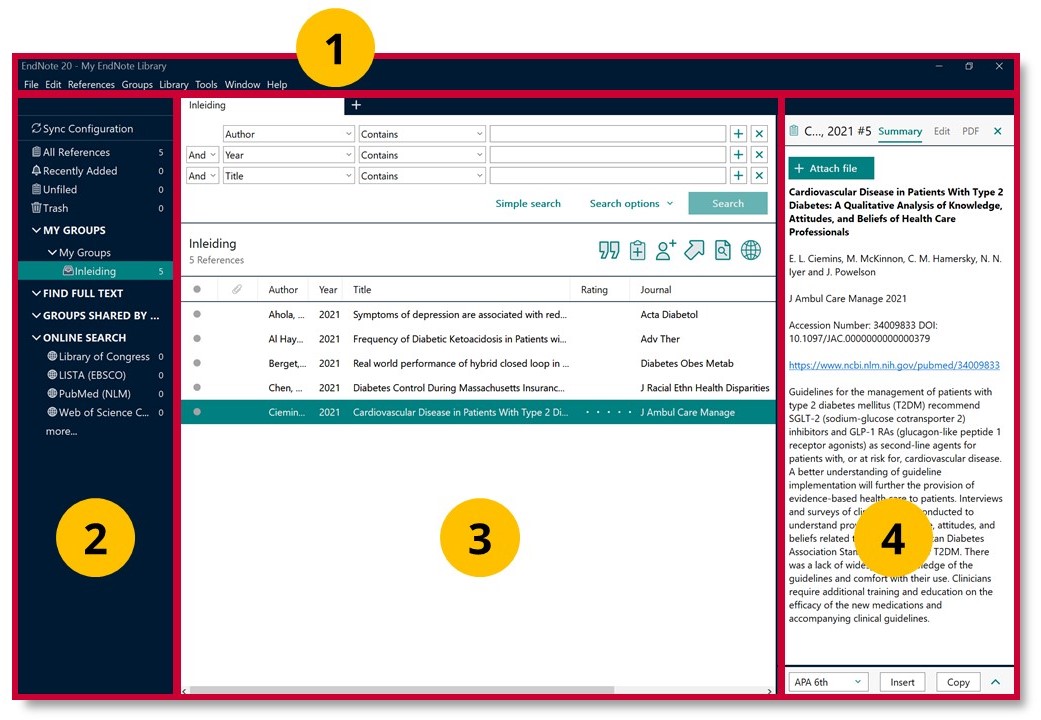
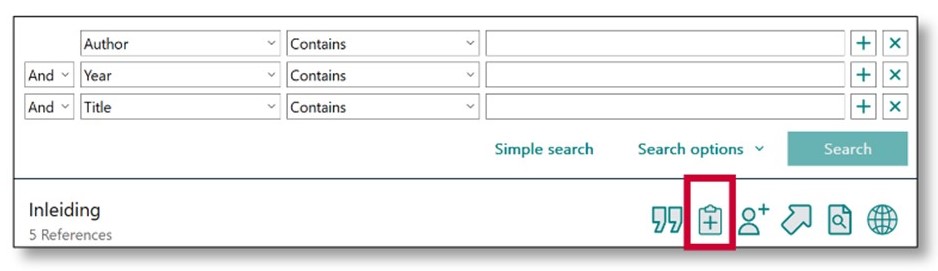
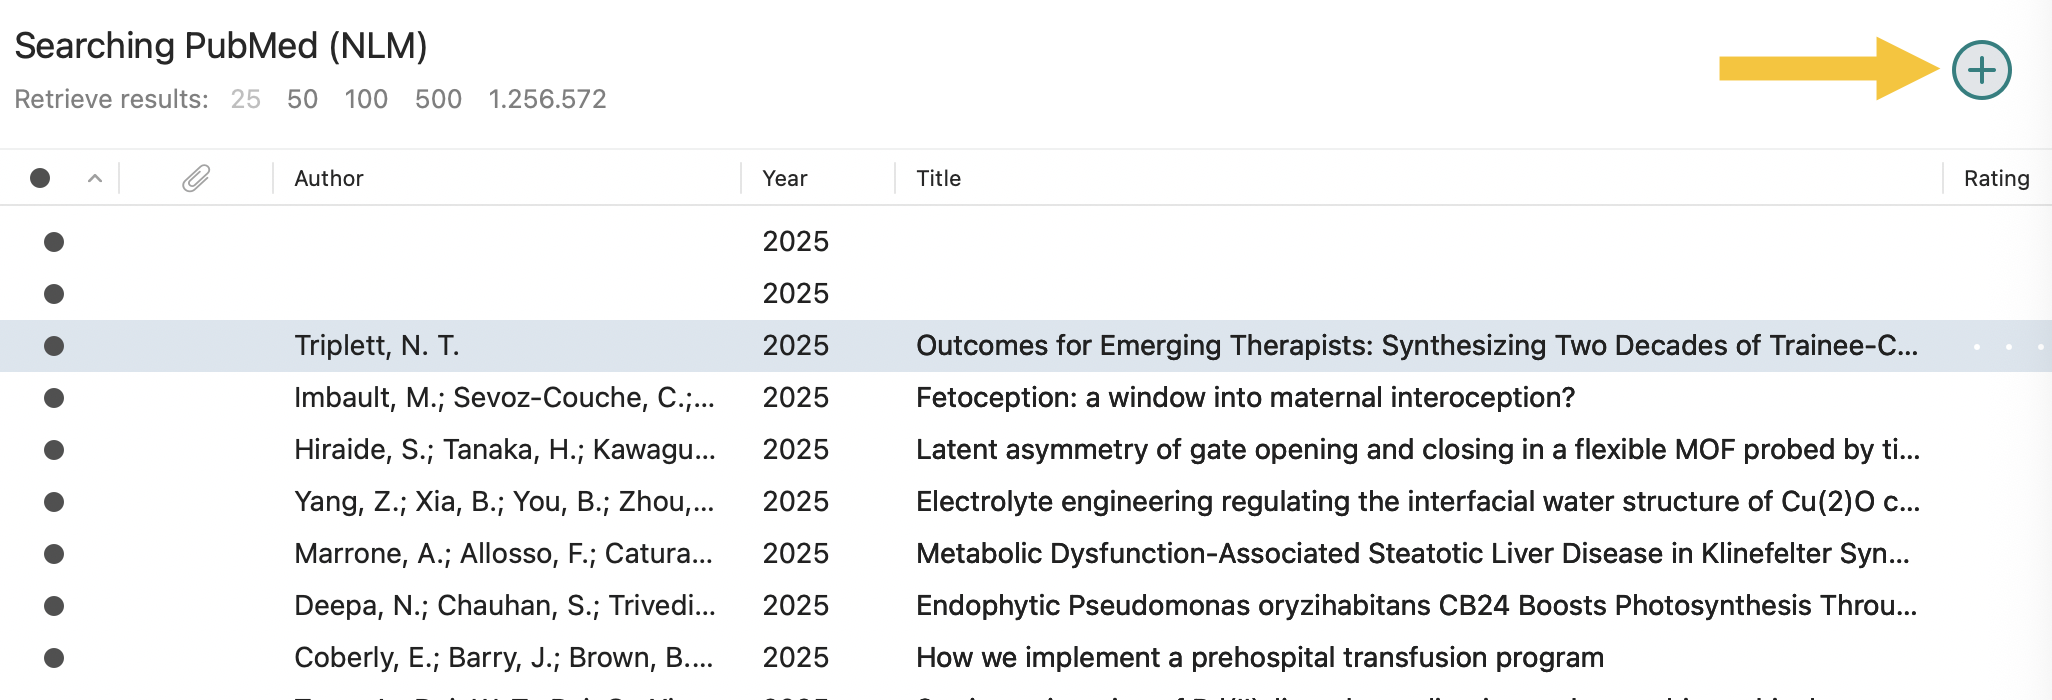
In the middle section of EndNote, click the 'New Reference' button, the clipboard with the plus sign in it.
In the pop-up window that appears, you can then enter details about your information source. The reference type is automatically set to 'Journal article'. If you want to change this, you can click on it and then select the correct reference source. If you do not know which reference type to select, look in the table below.
*If more dates available, fill in more fields.
Tip: For other sources of information, check the APA guidelines.
Besides selecting the right information source, the fields must also be filled in correctly. You can see some examples of this in the table below.
Saving reference
Once you have filled in all the information, click 'Save' and then you can close the window. Your reference will now be in your EndNote library.
4. Manage library
4.1 Creating groups
You can keep your EndNote library organised by creating groups, for example for a particular assignment. You can add references to several groups and you can also delete them from a group. When removing a reference from a group, it remains present in the 'All References' folder.
How do I create a group?
Select 'Groups' from the menu bar at the top
Click on 'Create Groups'. A group is now automatically created on the left-hand side.
Give the group a name.
How do I add references to a group?
Go to the 'All References' folder on the left and select the references you want to add to your new group/group set here.
Then right-click on the selected references and choose 'Add Reference to' and click on the desired group or group set.
How do I remove references from a group?
Right-click on the reference you want to delete.
Choose 'Remove reference from Group'.
Knowledge clip
Knowledge clip is without sound.
4.2 Searching for references
After you have added references in EndNote, you can search them. You do this by using the search field(s) in the middle panel of EndNote.
Figure 4 You can search for references using the panel in the centre of EndNote.
4.3 Sorting references
In the middle panel of EndNote, above the references is a bar with fields, including Author, Year, Title, Rating, Journal. By clicking on one of these fields you can sort the references, e.g. by alphabetical order or year. In addition to the fields you see, there are additional sorting options, click the cogwheel in order to see them.
Figure 5 References can be sorted by clicking on one of the fields. For more field options, look under the cogwheel, which appears when you hover over the bar with your mouse.
4.4 Editing references
You can edit a reference at any time.
Double-click the reference. The right-hand field now shows information about this reference.
Select the 'Edit' tab at the top right.
You can now edit fields.
After editing, click 'Save' at the top right.
4.5 Attaching files to references
You can attach a file to a reference in EndNote.
Click on the reference. The right-hand field now shows information about this reference.
Select the 'Summary' tab at the top right.
Click the green button '+ Attach file'.
You can now look up the file and click 'open
The file is now attached to the reference.
Knowledge clip
Knowlegde clip is without sound.
4.6 Save and backup your library
EndNote automatically saves changes you make, for example when you add references to a group. If you make changes to a reference itself, though, EndNote will ask if you want to save the changes
How do I make a back-up?
In the menu bar under 'File' you have the option 'Save a copy', if you choose this, EndNote saves a backup of your library. The backup can be saved to a chosen location and consists of the EndNote file (.enl) and the Data folder (.data).
Knowlegde clip 'Save a copy'
Knowlegde clip is without sound.
4.7 Group sharing/ online collaboration
It is possible to share references online, for example if you are doing a study with several people. For this, you can create a group that you can share with people inside and outside the organisation (they must be using Endnote).
To share a group, you need an online Endnote account. If you don't already have one, take a look at chapter 1 under synchronise.
Then go to the Endnote group you want to share and right-click there to see the options
Select share group
The following screen appears.
In the field at 1, enter the e-mail addresses of the people you want to share the group with. Note: Use the e-mail address they have used for their Endnote account, these cannot be used interchangeably. For example, if someone has used j.jansen@hr.nl for their account, you should not send the invitation to jansj@hr.nl
In field 2, you have to specify the invitee's permissions.
If you yourself have shared a group with someone else, there is now a “multiple people icon” in front of your group.
Groups shared by others can be found under groups shared by others.
Note!Groups shared with you, by someone else, are automatically opened in Endnote's web environment. The web environment has the same functionality, but a different look and feel. If you have any questions about the EndNote web environment, please contact the library.
5. Referencing in Word
Using EndNote is particularly interesting for creating an automatic bibliography and referencing in a text.
5.1 Customise citing style
APA citing style
Within the university (international programs) we often use the APA 7th edition, but there are many other citing styles available. The choice of a specific citing style is determined by your professor or the journal in which you want to publish.
The Dutch APA reference style (slightly different from the international edition) is not included in EndNote by default and you will have to download it. You can download it from the EndNote website.
Note! At this time (July 2023), the APA 7th edition Dutch reference style is not yet available for download.
Customise citing style
You can change the citing style by doing the following:
Go to the EndNote tab at the top of Word.
Click on the field behind 'Style'. This often defaults to 'Annotated'.
A list of all possible citing styles will now appear. For more options, check 'Select Another Style...'
Once you have chosen a new style, EndNote automatically adjusts the references in the text and in the bibliography to the new reference style.
5.2 Adding a reference
After installing EndNote, you will have a new EndNote tab in Word. You will need this tab if you want to add references from the library to your Word document.
Figure 6 After installing EndNote, there is an 'EndNote' tab in Word
You can add references in two ways, from Word or from EndNote. Both ways are fine and the choice is up to the user.
Option 1: Adding references from Word
Place the cursor in the Word document where you want to quote.
Go to the EndNote tab at the top.
Click on the 'Insert Citation' drop-down menu and select 'Insert Citation....’
Figure 7 Select 'Insert Citation...' from the drop-down menu
Use the search bar at the top left to search for the reference. Among other things, you can search by author, year, journal, title, etc.
Select the reference you want to add and click 'Insert'. The reference will now appear in both the text and the bibliography.
Option 2: Adding references from within EndNote
Place the cursor in the Word document where you want to add a reference.
Go to the EndNote tab at the top.
Click on 'Go to EndNote'.
Select the reference you want to add by clicking on it. You can click multiple references at the same time.
Click 'Tools' in the bar at the top.
Select 'Cite While You Write' and choose 'Insert selected citation(s)'. The reference will now appear in both the text and the bibliography.
Knowledge clips
Knowledge clip option 1
Knowledge clip is without sound.
Knowledge clip option 2
Knowledge clip is without sound.
5.3 Remove reference
You can always remove quoted references from the Word document. You only remove the reference from the Word document, the reference will remain in the EndNote library.
If it is a single reference then you can easily delete it, by selecting it and clicking the delete button.
If it is a reference to multiple sources, follow the next steps:
Select the reference you want to remove.
Go to the EndNote tab at the top.
Click 'Edit & Manage Citation(s)', a pop-up window will now appear showing the references in the Word document. The reference you have selected will be blue.
Then click on the arrow next to 'Edit reference' and choose 'Remove citation'.
Click on 'Ok'.
The reference will now be removed from the Word document.
Note! If the reference is there more than once, you only delete the reference you selected. It will remain in the other places in the Word document.
Knowledge clip
Knowledge clip is without sound.
5.4 Reference options
Referencing in text without brackets
When referencing in text, you sometimes want to reference 
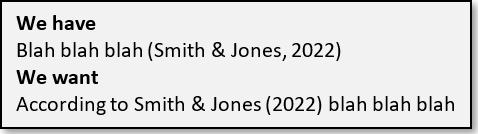
in a way other than parentheses.
You can change this in Word in the following way.
Right-click on the reference
Choose 'Edit citation(s)'
Select the option that best suits your text. Click 'more' if you want to add page numbers.
6. Advanced options
6.1 Searching via EndNote
EndNote's online systems also allow you to add references to your library. However, this is only recommended if you know exactly which reference you want to import. You cannot use EndNote to do a search, like you do in PubMed or One Business.
If you want to import a reference via EndNote's online system, follow the steps below.
Select the source in the left-hand column under 'Online Search'. If the source you want to search in is not listed, click 'more' and find your source in the list.
Then use the search window at the top to search. By default, you can search by author, year and title. Use the drop-down menu if you want to search by other terms.
Click on 'Search'.
Search results appear below the search window. If you want to add a reference to your library, select it and click the plus sign (yellow arrow in the image above).
Knowledge clip
Knowledge clip is without sound.
6.2 Create group set
How do I create a group set?
A group set allows you to organise different groups. So under a group set you put your created groups.
Select 'Groups' in the menu bar at the top
Click on 'Create Group Set'. A group set is now automatically created on the left-hand side.
Give the group set a name.
Knowlegde clip
Knowledge clip is without sound.
6.3 Compressed library
Sometimes it happens that you want to share your EndNote library with others. You can do this by creating a compressed library. A compressed library contains both EndNote files of your library, namely the EndNote file (.enl) and the linked data folder (.data). The compressed library is smaller than the EndNote file and data folder together. You can exchange it via e-mail with students or colleagues, for example.
How do I create a compressed library?
Go to 'File' in the menu bar and choose 'Compress library (.enlx)
In the pop-up window that appears, you can choose either 'Create' or 'Create & Email'. Choose the option that suits you best.
On the right-hand side, you can choose whether you want to save the compressed library with or without attachments. With attachments means that the added PDF files are also saved.
Then at the bottom you choose which references you want to save, all references in the entire library, or just a particular group/group set.
After this, click 'Next' and save the file in a desired location. If you have chosen 'Create & Email', your standard mail programme will now open, with the compressed library as an attachment, so you can send it.
How do I open a compressed library?
Find the compressed library, it can be recognised by the .enlx extension.
Open the compressed library. You will now see that the location where the compressed library was saved now contains a .enl and .data file.
You can now continue working in the EndNote library. Changes will automatically be saved in the EndNote file (.enl). If you want to share the library again, create a new compressed library.
Knowledge clip
Knowledge clip is without sound.
6.4 Duplicate references
If you import references from multiple databases into EndNote, you may find that you have some duplicate references in your library. You can detect these duplicate references in EndNote and deduplicate them.
Click on Library.
Select 'Find duplicates'
EndNote now shows the duplicate references and displays a pop-up window for the duplicates.
In the pop-up window, you can select the reference you want to keep by clicking 'Keep this record' above the reference. If you want to keep both references, click 'Skip' at the top right.
When there are no more duplicate references, the pop-up window will close.
Knowledge clip
Knowledge clip is withoutsound.
6.5 Switching from/to EndNote
If you have worked with a reference tool other than Endnote in the past, it is possible to transfer all your references from your old tool to EndNote. Below we briefly explain how you can make the switch from Refworks to Endnote.
In Refworks, go to the References option at the top left and click export
Select which references you want to export.
If you want to do all references at once go to the All References folder, note that you will lose your folder structure
If you want to keep your references organised, create an export file for each folder
Make sure the option Bibliographic Software is selected under select an export format
Click on export references
The file opens automatically in a new tab of your internet browser, save this using Ctrl+S as a text document (.txt) somewhere on your device
Open Endnote
Click File in the top left corner, go to the Import option and click File again there
Under Import file, select the .txt file you have just created
Under Import option, select Reference manager (RIS)
Click on import
Click here for a more detailed explanation. (The images are outdated but the functionalities are still in the same place).
Should you wish to switch to or from another tool, we are happy to help! Contact us at rotterdamuas.com/library
Note! Do not convert references from Word to EndNote. This is a possibility that Endnote offers, but if the references are entered incorrectly in Word they will also appear incorrectly in Endnote.
Note! Any attachments are not included in the export file.
Het arrangement Training EndNote 21 - ENG is gemaakt met
Wikiwijs van
Kennisnet. Wikiwijs is hét onderwijsplatform waar je leermiddelen zoekt,
maakt en deelt.
Dit lesmateriaal is gepubliceerd onder de Creative Commons Naamsvermelding 4.0
Internationale licentie. Dit houdt in dat je onder de voorwaarde van naamsvermelding vrij bent om:
het werk te delen - te kopiëren, te verspreiden en door te geven via elk medium of
bestandsformaat
het werk te bewerken - te remixen, te veranderen en afgeleide werken te maken
voor alle doeleinden, inclusief commerciële doeleinden.
Van dit lesmateriaal is de volgende aanvullende informatie beschikbaar:
Toelichting
Self-paced training aimed at enhancing skills in the reference management tool EndNote. The training consists of 6 modules. Each module contains explanations and sometimes short videos. You can go through the modules from start to finish or do them independently.
Leerniveau
HBO - Master;
HBO - Bachelor;
Eindgebruiker
leerling/student
Moeilijkheidsgraad
gemiddeld
Gebruikte Wikiwijs Arrangementen
Team Informatievaardigheid Hogeschool Rotterdam.
(z.d.).
Self-paced training aimed at enhancing skills in the reference management tool EndNote. The training consists of 6 modules. Each module contains explanations and sometimes short videos. You can go through the modules from start to finish or do them independently.
Leeromgevingen die gebruik maken van LTI kunnen Wikiwijs arrangementen en toetsen afspelen en resultaten
terugkoppelen. Hiervoor moet de leeromgeving wel bij Wikiwijs aangemeld zijn. Wil je gebruik maken van de LTI
koppeling? Meld je aan via info@wikiwijs.nl met het verzoek om een LTI
koppeling aan te gaan.
Maak je al gebruik van LTI? Gebruik dan de onderstaande Launch URL’s.
Arrangement
IMSCC package
Wil je de Launch URL’s niet los kopiëren, maar in één keer downloaden? Download dan de IMSCC package.
Wikiwijs lesmateriaal kan worden gebruikt in een externe leeromgeving. Er kunnen koppelingen worden gemaakt en
het lesmateriaal kan op verschillende manieren worden geëxporteerd. Meer informatie hierover kun je vinden op
onze Developers Wiki.